Today I’m going to talk about one of my favourite toys. I bought my first set of these about 5 years’ ago (they recently had to be replaced) and I’ve also bought them as birthday presents for quite a few birthday parties that my daughter has been invited to! Some toys or games I buy, I can be very enthusiastic about for a few months and then they get relegated to the back of the cupboard. However, 5 years later, I still always have my stacking robots with me. Why? Because they are really fun and also really versatile – 2 essential qualities in any speech therapy toy.
Elizabeth shared a story about how she used these way back in 2012. You can read that post here. Today though, I am going to share some of the many ways I have used these to target different speech and language skills.
- First words. At their simplest, you can build a lovely tall tower of these robots. As we put each one on, we say “up”, then when we knock the tower we say “go” or “all fall down”. Then I wait and see if the child can say “more” or “again” to repeat the game. The repetition of the same few words really helps children to develop their first few words.
- Attention and listening. This is really an extension of the first words. I get the child to wait until I say “go” before they knock the tower down. Gradually I pause slightly longer each time between “ready….steady….go” to build up their attention span.
- Turn-taking. These are a great game for developing turn-taking as the turns are short and two children can take turns to put on a robot or two and build a structure together. This works particularly well for slightly older children, who need to work on basic turn-taking and interacting with other children, but have perhaps grown out of bubbles and rolling a ball. The turns are as simple and basic, but the game itself is a little more sophisticated.
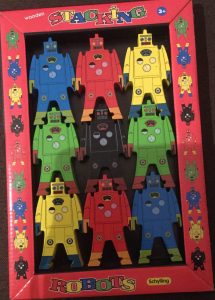
- Colours. There is 1 black robot and the others are in beautiful, bright primary colours. If I am working on understanding colour words, I will lay them all out and ask the child to “put a red one on” or sometimes just “red”. Once they can consistently find the right ones, I start asking the child to name the colour before they add the robot to the tower. Sometimes I reduce it to just two or three colours and we just build a smaller tower!
- Prepositions. I work with one child who has just grasped the meaning of on and under but finds it really hard to use them himself. We have been building a robot tower and saying “on the top”each time we add one. After a couple of sessions he is now saying “red one on the top”, “black one on the top” consistently without prompting. If I am working on a wider range of prepositions, I sometimes play hide and seek with these. I ask the child to tell me where to hide each robot. Alternatively, I hide them, get the child to look for them and then tell me where they found each one.
- Body parts. This may not seem like the most natural resource to use for body parts (and I wouldn’t start with this), but they can be useful. You can attach the robots together in lots of different ways. They can hand on by their hands, shoulders, feet or heads so they can be a great way to consolidate these words.
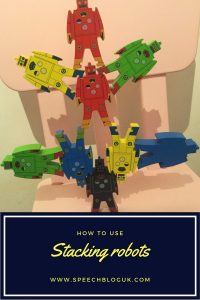
- Motivator. I very often just use these as a way to make lots of repetition or hard work more fun! They are great for speech sound work, especially with slightly older children, who often get very involved and enjoy the challenge of seeing how many different structures they can build. I will often take photos of what they have made and I will come on to how I use these later! One child made a very complex structure that I have never been able to recreate!
- Assessments. This is really just another way of using a motivator, but I do this frequently so I thought it deserved its own point! When I am doing language assessments with older children, we will take a break after a couple of sub-tests to play a game. With Junior age children this is almost always one that I offer, and it’s very popular. I often get asked if we can build with them some more. “OK, we’ll just look at a few more pictures, then we’ll build another one” I say. The child is usually happy to do a bit more of the assessment.
- Giving and receiving instructions. This is what I do with those photos I mentioned earlier. There are 9 pictures of different things you can build on the box. In addition, I have collected together about 35 more photos of things various children have made. I use these to play a barrier game. I take a picture and describe to the child how to build what is on my card. Then they take a picture and describe to me how to build it.
- Reasoning skills. We often end up having great conversations about the robots while we are building. In the pictures on the box, the black one is usually at the bottom, so several children have asked why and we try to think of reasons. Usually we decide that he must be the strongest! We sometimes talk about why certain structures work and others don’t and experiment with different structures to see if they balance.
- Imaginative play and sequencing! Finally, I have seen some children engage in great imaginative play with these. I work with one boy, who loves to line them up as two armies and comes up with fantastic stories about what happens to them. His stories can often be very muddled though, so then we slow down, and tell the story back one step at a time, using the robots to act it out!
If you don’t have a set of these already and you want some, you can find them on Amazon here. Have fun!


Leave a Reply